With the launch of iOS 11.3, service worker is officially supported in iOS safari. Now crafting a performant, reliable progressive web app can be really beneficial for users and businesses. This tutorial will demonstrate how to use Workbox to set up and configure a service worker for an existing SSR React SPA to turn it into a PWA. The demo app can be found on GitHub.
A Brief Introduction to PWA
According to MDN,
PWAs are web apps developed using a number of specific technologies and standard patterns to allow them to take advantage of both web and native app features.
It bring a lot of cool features like add to home screen, offline experience, and push notifications to web apps, giving them a native taste. The core technology to PWA is Service Worker, which acts as proxy servers that sit between web applications, the browser, and the network (when available). With a properly configured service worker, we are able to turn an existing SPA into a PWA and bring native experiences to users.
A Server-Side-Rendered SPA
There're a lot of pros and cons to use Server Side Rendering (SSR) in a SPA. Personally I think SSR is really essential if you want your website to be more discoverable by the web. From my experience, although google claimed they are able to crawl websites rendered on client side, there's still a big difference in page ranking between the same ones rendered on server side. Not to mention there're lots of other search engines and social medias which are unable to crawl client-side-rendered content.
Therefore, I created a tiny SSR enabled React SPA to demo for the tutorial. It uses Webpack for bundling, has no router and only has one simple page. Our main focus will be on the configuration of the service worker.

App Shell
PWA is architected around an application shell (app shell). It contains all local resources a web app needs to load the skeleton of user interface so it works offline and populates its content using JavaScript. Installing an app shell is like installing a native app, the difference is that for web apps the browser fetches and caches files like html, JavaScript, CSS using service workers.
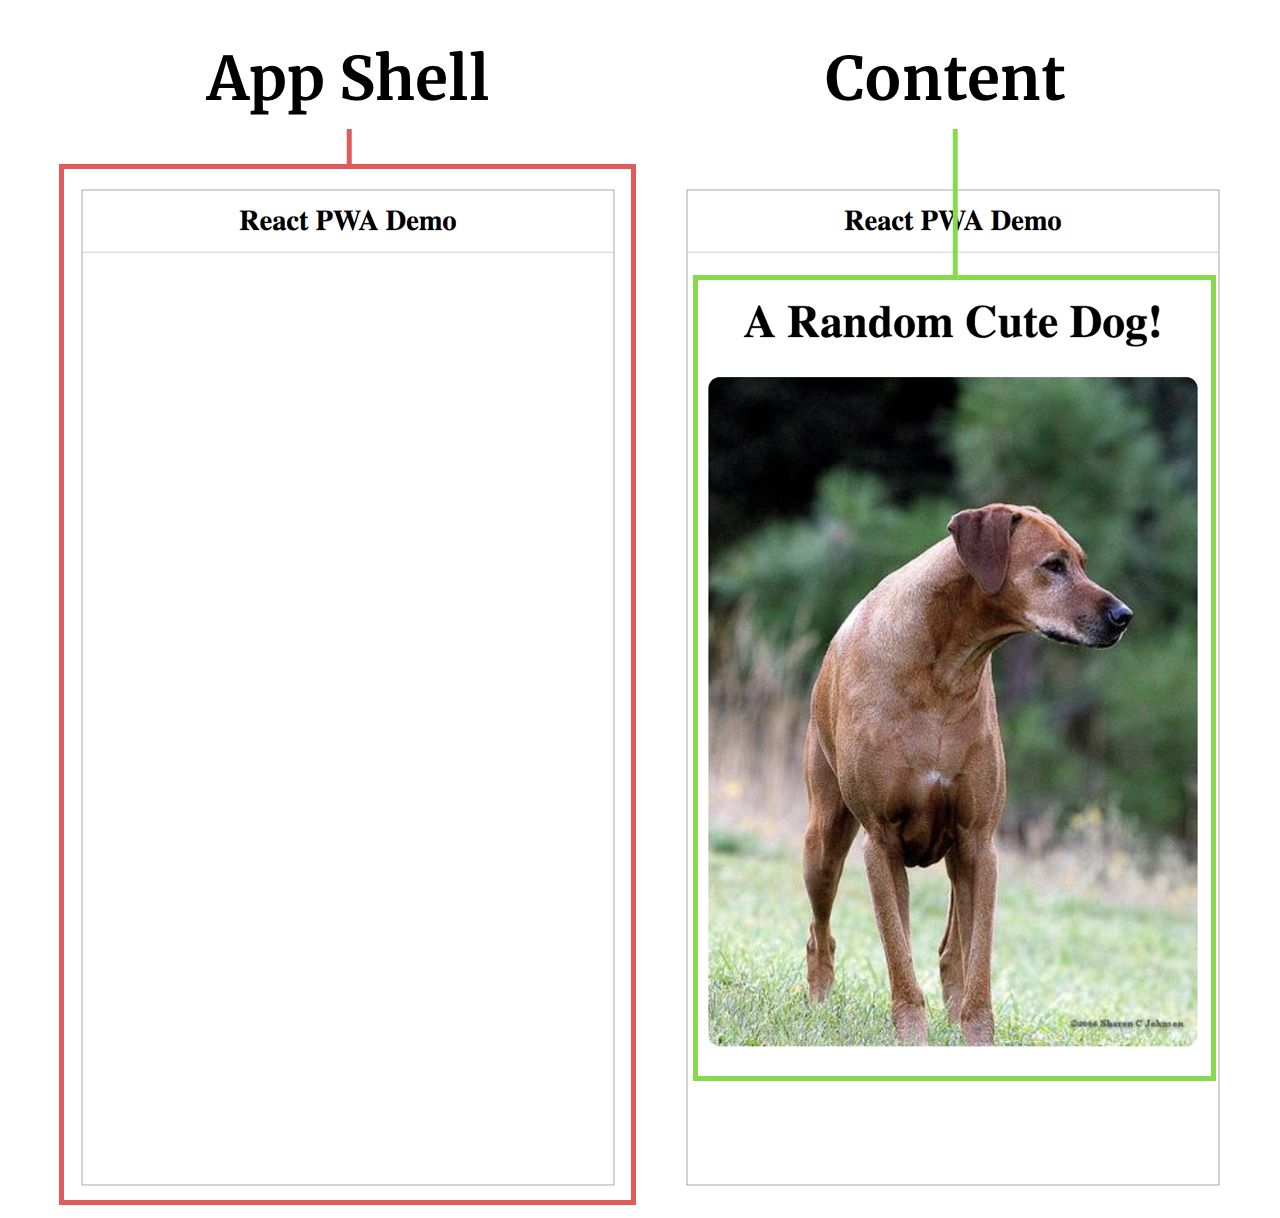
SPA fits perfectly for the app shell model. Especially for those compiled using Webpack, installing an app shell is just downloading and caching the static files built by Webpack. So what we'll do is to use a Webpack plugin to extract static file urls into a manifest and import it into our service worker configuration.
However, there's one issue if we enable SSR for a SPA, which is the variation of the html file. Different page requests can return different html files depending on their specific server side logic. So in order to make the app shell work, we need to cache a generic html file. We can configure a special path like /app-shell on the server to return a skeleton html file, and let the service worker fetch it during installation. Once the app shell is installed, all future page requests including opening a new page will be handled using that generic html until the installed server worker gets an update. In this way, search engine robots will always crawl the pre-rendered page while normal users are able to enjoy the native experience PWAs provide.
Now the strategy is clear, next we will dig into the details of the setup. I will break the service worker configuration into 3 steps:
- Precaching and routing static files for the app shell.
- Routing other network requests.
- Registering the service worker.
Let's get started!
Precache and Route Static Files
As the demo app is bundled using Webpack, we use workbox-webpack-plugin to generate the service worker config file. First install the plugin,
npm i -D workbox-webpack-plugin
Then insert the following codes into the Webpack config file.
const { InjectManifest } = require('workbox-webpack-plugin');
...
  plugins: [
    ...
    new InjectManifest({
      swDest: 'sw.js',
      swSrc: 'path/to/sw-template.js',
      include: ['/app-shell', /\.js$/, /\.css$/],
      templatedUrls: {
        '/app-shell': new Date().toString(),
      },
    }),
  ],
This plugin is able to extract file paths during Webpack building process and generate a service worker config file. It provides two sub plugins. We choose to use InjectManifest plugin rather than GenerateSW plugin to gain more controls over the service worker created.
InjectManifest plugin is able to generate a list of urls to precache and add that precache manifest to an existing service worker file. Here are some of its basic settings:
swDest
The path and filename of the service worker file that will be created by the build process, relative to the webpack output directory.swSrc
The path to the service worker template file that can contain our own customized code. We'll talk about the template's details later.include
all the assets matching listed patterns will be included in the precache manifest. It should include all files used to render the app shell.templatedUrls
These urls are used to get specific files like app shell which are not built directly by Webpack. Because in precache manifest every url needs arevisionstring for versioning, we also need to provide arevisionfor templateUrls. Here I usenew Date()to make therevisionunique.
Now let's talk about the service worker template file, which I named as sw-template.js. It contains all the other settings we need. Here are simplified settings for precaching:
self.__precacheManifest = [].concat(self.__precacheManifest || []);

// precahce and route asserts built by webpack
workbox.precaching.precacheAndRoute(self.__precacheManifest, {});

// return app shell for all navigation requests
workbox.routing.registerNavigationRoute('/app-shell');
Once the app is successfully built by Webpack, the following line will be injected into sw-template.js and generate a new file using swDest specified name and location.
importScripts("/precache-manifest.{hash}.js", "https://storage.googleapis.com/workbox-cdn/releases/3.5.0/workbox-sw.js");
We notice in additon to the manifest file, a workbox-sw.js is also imported. This is the library we use to set up our service work conveniently. With the imported manifest, self.__precacheManifest now stores all urls that need to be precached. Then we call workbox.precaching.precacheAndRoute() to tell the service worker to fetch and cache all these urls in its install process and use the cached version to serve all future matched requests.
Because the app shell's html file is fetched thought a special route /app-shell, in order to use the cached html for future page requests like /about, we need to use workbox.routing.registerNavigationRoute to tell the service worker to serve all future navigation requests thought /app-shell.
Routing Other Network Requests
After configuring caching and routing for the app shell, next we will configure routing for other network requests. Below are codes for this part.
// routing for api
workbox.routing.registerRoute(
  /^https:\/\/dog.ceo/i,
  workbox.strategies.networkFirst({
    cacheName: 'react-pwa-demo-api-cache'
  })
);

// routing for cloud served images
workbox.routing.registerRoute(
  /^https:\/\/.+\.(jpe?g|png|gif|svg)$/i,
  workbox.strategies.cacheFirst({
    cacheName: 'react-pwa-demo-image-cache',
    plugins: [
      new workbox.expiration.Plugin({
        // Only cache requests for a week
        maxAgeSeconds: 7 * 24 * 60 * 60
        // Only cache 20 requests.
        maxEntries: 20
      }),
      new workbox.cacheableResponse.Plugin({
        statuses: [0, 200]
      })
    ]
  })
);
The registerRoute will try to match requests' urls with the capture specified and apply corresponding caching strategy if matched. Workbox provides a lot of strategies out of box to handle different kinds of requests. Here I use networkFirst strategy for API requests as API's content can change frequently and needs to be up-to-date. And for image requests, I prefer cacheFirst strategy as image urls are usually unique and permanent. If you want to learn more about cache strategies, The Offline Cookbook and workbox's doc are great references.
Workbox also comes with a set of plugins that can be used with these strategies. Here workbox.expiration.Plugin is used to specify the duration and maximum number of requests for image caches, and workbox.cacheableResponse.Plugin is used to handle CORS image requests. By default cacheFirst strategy only caches responses with a status of 200. If the images we request are on a different domain which doesn't support CORS, the responses will be treated as opaque responses with a status of 0. Even though these cross-origin images are requested using <img> tags, to which CORS doesn't apply, they will still not be cached if using cacheFirst. Therefore we use cacheableResponse plugin to enable cacheFirst to cache responses with status of 0 in order to cache images from different a origin which doesn't support CORS.
I also add the following two lines to make sure once the service worker is installed or updated, it will control the web page immediately.
workbox.clientsClaim();
workbox.skipWaiting();
The full sw-template.js file can be found here.
Register the Service Worker
The last step is to register our generated sw.js file. We need to insert following codes into html template.
<script>
  if ('serviceWorker' in navigator) {
    window.addEventListener('load', function() {
      navigator.serviceWorker.register('/sw.js').then(function(registration) {
        console.log('ServiceWorker registration successful with scope: ', registration.scope);
      }, function(err) {
        console.log('ServiceWorker registration failed: ', err);
      });
    });
  }
</script>
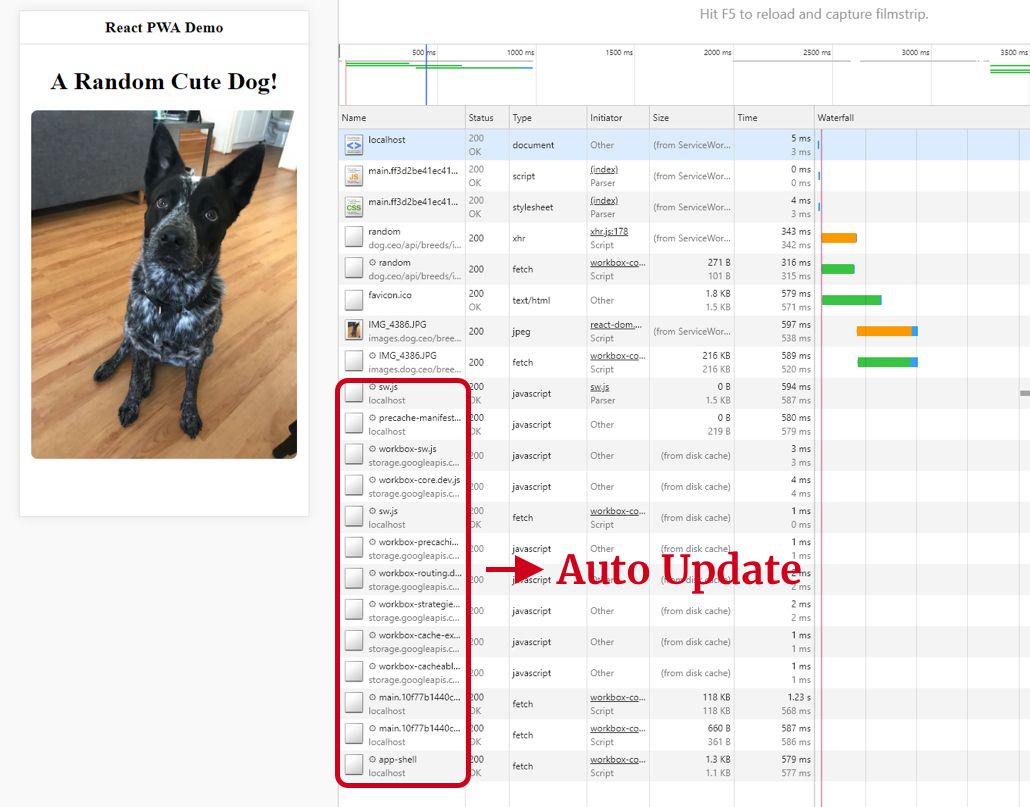
You may ask that do we need some extra settings for updating the service worker. No, we don't. The browser will auto fetch sw.js every time we start a new page. Once it finds there are byte-differences it will automatically update the service worker.
Now everything is settled, let's check that result!
App Demo
Below are some screenshots token when the demo was running in fast 3G network condition.
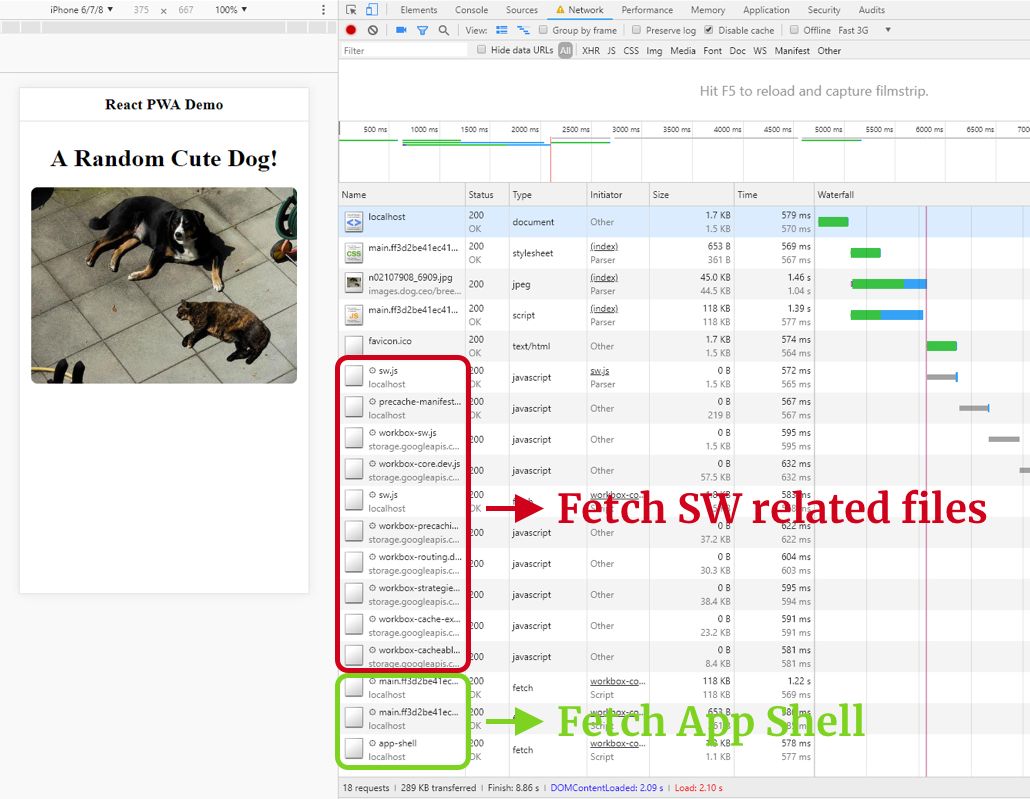
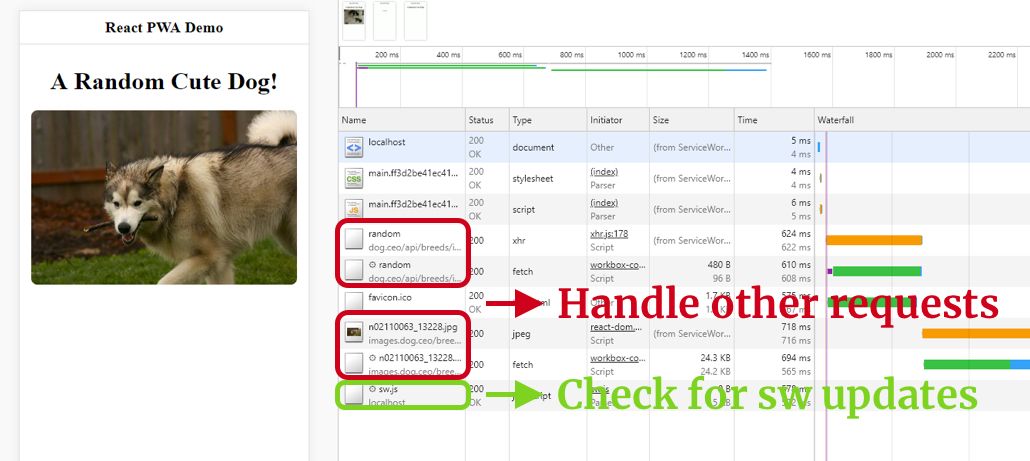

As you can see, the demo app runs exactly as we expected and even works in offline mode. If we make some changes and rebuild then restart the server, the service worker will get updated automatically.
Conclusion
In this tutorial we used workbox to configure a service worker for a server-side-rendered SPA and turned it into a simple PWA. The service worker we created is just a skeleton. We can add more settings to enable more features like background sync and push notifications. Also we can add a manifest file to make the web app look more native once it's added to home screen. There're a lot more we can explore. PWA really brings much more possibilities to the web world and is worth our try!